RV enthusiasts know the importance of reliable electrical connections. A 50 amp twist lock plug ensures your RV gets the power it needs.
Understanding the wiring diagram for this plug can seem daunting. But it’s crucial for safety and performance. In this guide, we’ll break down the RV 50 amp twist lock plug wiring diagram step by step. We’ll make it easy to follow and understand.
Whether you’re a seasoned RVer or a newbie, this information will help you avoid common mistakes. Get ready to power up your RV with confidence!
Tools And Materials Needed
Wiring an RV 50 Amp Twist Lock Plug is a task that requires precision. To ensure safety and efficiency, it’s essential to have the right tools and materials at hand. This guide will help you gather everything you need for a successful installation.
Essential Tools
Having the right tools can make the wiring process smoother and safer. Here are the essential tools you’ll need:
- Wire Strippers: For removing insulation from wires.
- Screwdrivers: Both flathead and Phillips for securing connections.
- Multimeter: To test voltage and continuity.
- Utility Knife: For cutting and preparing the cable.
- Needle-nose Pliers: For bending and shaping wires.
- Electrical Tape: To secure and insulate connections.
- Voltage Tester: Ensures circuits are not live before working.
Required Materials
Proper materials are crucial for a safe and effective wiring job. Make sure you have the following:
- 50 Amp Twist Lock Plug: The main component for this wiring project.
- 50 Amp Power Cord: Heavy-duty cord suitable for 50 amp service.
- Wire Connectors: To join and secure wire connections.
- Heat Shrink Tubing: For insulating and protecting wire joints.
- Cable Ties: To organize and manage cables.
- Electrical Box: For housing the connections.
With these tools and materials, you’re well-equipped to handle the wiring of your RV 50 Amp Twist Lock Plug. Always prioritize safety and double-check your connections before powering up.
Safety Precautions
Understanding the RV 50 Amp Twist Lock Plug Wiring Diagram is crucial for ensuring safe electrical connections. Following the right safety precautions helps prevent accidents and damage to your RV.
Electrical Safety Tips
Working with electricity requires careful attention. Here are some essential electrical safety tips:
- Turn off the power before starting any wiring work.
- Use a voltage tester to confirm the power is off.
- Ensure your hands are dry before handling electrical components.
- Avoid working in wet or damp conditions.
- Use insulated tools to reduce the risk of shocks.
Personal Protective Equipment
Wearing the right personal protective equipment (PPE) is vital. Here is a list of recommended PPE:
| Equipment | Description |
|---|---|
| Insulated Gloves | Protects your hands from electrical shocks. |
| Safety Goggles | Prevents debris from entering your eyes. |
| Rubber-Soled Shoes | Reduces the risk of electrical conduction. |
| Protective Clothing | Prevents burns and abrasions. |
Always prioritize safety by using the proper equipment and following safe practices. These steps help ensure a safe and successful wiring project for your RV.
Understanding The Wiring Diagram
The RV 50 Amp Twist Lock Plug Wiring Diagram is vital for safe electrical connections. It ensures the plug connects correctly to the power source. This guide helps you understand the key components and the color code used in the wiring diagram.
Key Components
The wiring diagram includes several essential components:
- Ground Wire: Ensures safety by connecting to the earth.
- Neutral Wire: Carries the current back to the power source.
- Hot Wires: Two wires that carry electrical current to the RV.
Color Code Explanation
Understanding the color codes in the wiring diagram is crucial. Here is a simple table to explain the standard color codes:
| Wire Color | Function |
|---|---|
| Green | Ground |
| White | Neutral |
| Black | Hot (L1) |
| Red | Hot (L2) |
These color codes help identify the function of each wire. The green wire connects to the ground. The white wire is the neutral wire. Black and red wires are hot wires. They carry electrical current to the RV.
By understanding these components and color codes, you can ensure the correct wiring of your RV 50 amp twist lock plug. This knowledge helps you avoid common wiring mistakes and ensures a safe and reliable electrical connection.
Step-by-step Wiring Process
Wiring an RV 50 Amp Twist Lock Plug can seem complex. By following a step-by-step process, it becomes manageable. This section will guide you through the entire process, ensuring you complete it safely and correctly.
Preparing The Wires
First, gather all the necessary tools. You will need a wire stripper, a screwdriver, and the RV 50 Amp Twist Lock Plug. Make sure you have 50-amp wire with the correct gauge.
Strip about 1 inch of insulation from the ends of each wire. This exposes the copper, which you will connect to the plug. Ensure the wires are clean and free of nicks.
Connecting The Wires
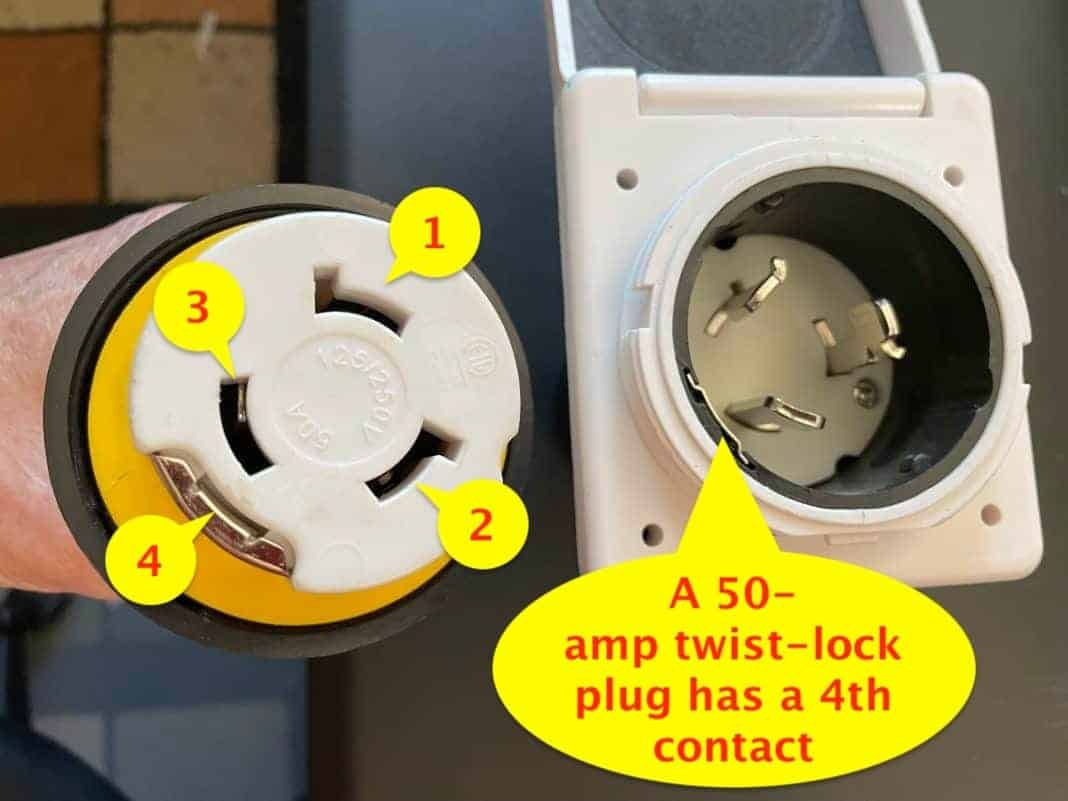
The RV 50 Amp Twist Lock Plug has four terminals: two hot, one neutral, and one ground.
- Connect the Hot Wires: Attach the black and red wires to the hot terminals. These are usually marked as X and Y.
- Connect the Neutral Wire: Attach the white wire to the neutral terminal, marked as W.
- Connect the Ground Wire: Attach the green or bare wire to the ground terminal, marked as G.
Tighten all the screws securely. Ensure there is no exposed wire that could cause a short circuit.
| Wire Color | Terminal |
|---|---|
| Black | X (Hot) |
| Red | Y (Hot) |
| White | W (Neutral) |
| Green or Bare | G (Ground) |
After connecting the wires, double-check everything. Ensure all connections are tight and secure. Your RV 50 Amp Twist Lock Plug is now wired and ready for use.
Testing The Connection
Testing the connection of your RV 50 Amp Twist Lock Plug Wiring Diagram is crucial. This ensures safety and reliable power supply. Follow these steps to test your connection.
Using A Multimeter
First, gather your tools. A multimeter is essential. Set it to measure voltage. Connect the multimeter probes to the plug terminals. The reading should be within 220-240 volts. If not, recheck your wiring. Multimeters help identify issues quickly.
Ensuring Proper Functionality
Next, confirm the plug’s functionality. Plug the twist lock into a power source. Check for a secure connection. Ensure no loose wires. Test appliances within the RV. They should operate without interruption. Proper functionality indicates a successful connection. Regular testing maintains safety.
Credit: www.irv2.com
Common Mistakes To Avoid
When working with an RV 50 Amp Twist Lock Plug Wiring Diagram, there are common mistakes to avoid. These errors can lead to serious safety issues or malfunctioning equipment. Awareness of these mistakes helps ensure a smooth and safe installation process.
Incorrect Wire Connections
One common mistake is making incorrect wire connections. Mixing up the wires can cause severe problems. Always double-check the color codes and the connections. Ensure the wires are connected to the right terminals. Use a wire stripper to remove insulation carefully. Do not damage the wire strands. Tighten all connections securely to avoid loose wires.
Skipping Safety Checks
Another mistake is skipping safety checks. Always inspect the wiring before plugging in. Look for any exposed wires or damaged insulation. These can cause short circuits or electrical shocks. Use a multimeter to check the connections. Ensure there are no power leaks. Test the plug after wiring to confirm everything works correctly.
Following these steps ensures a safe and efficient setup. Avoiding these common mistakes will help you enjoy a trouble-free RV experience.
Maintenance Tips
Maintaining your RV 50 Amp Twist Lock Plug wiring diagram is essential. Regular maintenance ensures safety and efficient power usage. Follow these tips to keep everything in top shape.
Regular Inspections
Regular inspections are crucial for your RV’s electrical system. Check for any signs of wear or damage. Look at the plug’s prongs and the wiring connections. Ensure they are secure and not corroded.
- Check the prongs for corrosion.
- Ensure connections are tight.
- Look for any frayed wires.
Inspecting your plug every few months can prevent larger issues. If you find any damage, address it promptly.
Handling Repairs
Handling repairs on your RV 50 Amp Twist Lock Plug wiring diagram requires care. If you notice any issues, repair them quickly. Use the correct tools and follow safety guidelines.
- Disconnect the power before starting repairs.
- Use insulated tools for safety.
- Follow the wiring diagram closely.
For complex repairs, consider hiring a professional. This ensures the work is done correctly and safely.
| Repair Task | Tools Needed | Estimated Time |
|---|---|---|
| Replacing a Plug | Wire Strippers, Screwdrivers | 30 minutes |
| Fixing a Loose Connection | Wrench, Pliers | 15 minutes |
| Inspecting Wires | Multimeter, Flashlight | 20 minutes |
By following these tips, you can maintain your RV’s electrical system. This ensures safety and reliability during your travels.

Credit: www.nooutage.com

Credit: www.pinterest.com
Frequently Asked Questions
What Is A 50 Amp Twist Lock Plug?
A 50 Amp twist lock plug is used for RVs. It provides a secure connection to power sources. The twist lock prevents accidental disconnection.
How Do You Wire A 50 Amp Twist Lock Plug?
To wire a 50 Amp twist lock plug, connect the wires to the designated terminals. Follow the color-coded wiring diagram. Ensure all connections are secure.
What Tools Are Needed For Wiring?
You need a screwdriver, wire stripper, and electrical tape. These tools help in securely connecting the wires.
Why Is A Wiring Diagram Important?
A wiring diagram ensures proper connections. It prevents errors and potential electrical hazards. Always follow the diagram for safe wiring.
Conclusion
Understanding the RV 50 amp twist lock plug wiring diagram is crucial. Proper wiring ensures safety and functionality. Follow the steps outlined to avoid common mistakes. Check your connections twice to prevent issues. Always use the right tools and equipment.
Consult a professional if uncertain. A well-wired plug enhances your RV experience. Enjoy your travels with confidence and peace of mind.