Replacing your Dometic RV refrigerator can seem daunting. But it’s easier than you think.
Whether your fridge has stopped working or you want an upgrade, replacing it can enhance your RV experience. A new refrigerator can offer better efficiency, more space, and modern features. This guide will help you understand the steps involved in replacing your Dometic RV refrigerator.
From selecting the right model to the actual installation, we’ve got you covered. Get ready to enjoy cold drinks and fresh food on your next RV adventure. Let’s dive into the process of replacing your RV refrigerator and making your trips more enjoyable.
Credit: escapees.com
Gathering Tools And Materials
Replacing your Dometic RV refrigerator is a significant task. It requires careful preparation. Gathering the right tools and materials ensures a smooth process. Below, find the essential tools and required replacement parts.
Essential Tools Needed
Ensure you have all the necessary tools before starting. Here is a list:
- Screwdrivers: Both flathead and Phillips.
- Wrench Set: For various nut sizes.
- Drill: With suitable bits.
- Multimeter: To check electrical connections.
- Level: To ensure the refrigerator is even.
- Gloves: For safety.
- Safety Glasses: To protect your eyes.
Required Replacement Parts
Having the right replacement parts is crucial. Below are the parts you may need:
| Part | Description |
|---|---|
| New Refrigerator | Your new Dometic RV refrigerator model. |
| Mounting Brackets | To secure the refrigerator in place. |
| Seals and Gaskets | For proper insulation and fit. |
| Electrical Connectors | For connecting the new unit. |
| Gas Line Fittings | If your refrigerator uses propane. |
With these tools and parts ready, you can start replacing your refrigerator. This preparation saves time and ensures a smoother installation.
Preparing For The Replacement
Replacing your Dometic RV refrigerator is a major task. Preparing properly ensures the process goes smoothly. This section will guide you through essential steps before starting the replacement.
Safety Precautions
Safety first. Before you begin, make sure to disconnect power. Turn off the propane supply. This prevents accidents. Wear protective gloves and safety glasses. These protect you from sharp edges and debris. It’s also a good idea to have a fire extinguisher nearby.
Check the area around the refrigerator. Ensure it’s clear of obstacles. This makes it easier to move the old unit out and the new one in. Use a dolly or another moving tool. This helps prevent injuries and damage.
Emptying And Cleaning The Old Refrigerator
Before removing the old refrigerator, empty it completely. Take out all food items. Store them in a cooler temporarily. Remove all shelves and drawers. This makes the unit lighter and easier to move.
Next, clean the old refrigerator thoroughly. Use a mild cleaner and a soft cloth. Wipe down all surfaces inside. This prevents any lingering odors. It also ensures that no food particles are left behind. A clean refrigerator is easier to handle and dispose of.
| Step | Action |
|---|---|
| 1 | Disconnect power and propane supply |
| 2 | Wear protective gear |
| 3 | Clear the area |
| 4 | Use a dolly or moving tool |
| 5 | Empty the refrigerator |
| 6 | Clean the refrigerator |
Following these steps ensures your replacement process is safe and efficient. Take your time and don’t rush. Safety and preparation are key.
Removing The Old Refrigerator
Replacing your Dometic RV refrigerator can be a daunting task. But, with the right steps, it becomes manageable. The first step is removing the old refrigerator. This section will guide you through the process.
Disconnecting Power And Gas
Safety is crucial. Start by disconnecting the power and gas supply. Turn off the main power switch of your RV. This ensures no electricity flows to the refrigerator. Next, locate the gas valve. Turn it off to stop the gas supply. This prevents any gas leakage during removal.
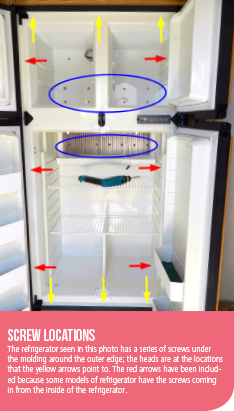
Unbolting And Removing The Unit
Once the power and gas are disconnected, it’s time to unbolt the refrigerator. Open the refrigerator door. Look for screws that secure it to the cabinet. Use a screwdriver to remove these screws. Be careful not to damage the surrounding area.
With the screws removed, gently pull the refrigerator out of its compartment. You may need a helping hand. These units can be heavy. Carefully slide it out and place it on the floor. Ensure the area is clear of obstacles to avoid any damage.
Now, your old refrigerator is ready to be taken out of the RV. Dispose of it properly. Check with your local waste management facility for guidelines. By following these steps, you can safely remove your old Dometic RV refrigerator.

Credit: www.loveyourrv.com
Installing The New Refrigerator
Installing a new Dometic RV refrigerator can seem like a big task. With the right steps, it becomes simple and manageable. In this guide, we will break down the installation process. Let’s ensure your new fridge is set up correctly and securely.
Positioning The New Unit
First, place the new refrigerator near the RV’s opening. This makes it easier to slide into its spot. Check the power and gas connections. Make sure they align with the new unit. Ensure there is enough space around the refrigerator for proper ventilation. Proper airflow is crucial for the fridge’s efficiency.
Securing The Refrigerator In Place
Once the refrigerator is in position, secure it. Use mounting brackets for stability. Attach the brackets to the RV walls. Tighten all screws firmly. This prevents the fridge from moving during travel. Check the level of the refrigerator. Use a spirit level to ensure it is even. An uneven fridge can cause cooling issues. Adjust the unit’s position if needed.
Connect the power and gas lines carefully. Ensure there are no leaks. Double-check all connections for safety. After securing everything, turn on the refrigerator. Allow it to cool down for several hours. This ensures it is working correctly before loading it with food.
Connecting Power And Gas
Replacing your Dometic RV refrigerator involves more than just removing the old unit and installing the new one. Connecting power and gas is crucial for proper function. This step ensures your refrigerator gets the necessary energy to operate efficiently.
Reconnecting Electrical Wires
Before starting, disconnect the RV from any power source. This is a safety measure. Locate the electrical wires for the refrigerator. You will find these in the back panel.
- Identify the positive and negative wires.
- Use wire connectors to attach the new refrigerator wires.
- Secure the connections with electrical tape.
Ensure there are no loose connections. Loose wires can cause malfunctions or even fire hazards. After securing the wires, reconnect your RV to the power source and test the refrigerator.
Hooking Up The Gas Line
Connecting the gas line is the next critical step. Ensure the gas supply is turned off before starting. Identify the gas inlet on the refrigerator.
- Use a wrench to connect the gas hose to the inlet.
- Ensure the connection is tight to prevent leaks.
- Turn on the gas supply and check for leaks using a soapy water solution.
Any bubbles indicate a leak. Tighten the connection further if necessary. Once confirmed, your gas supply is secure, and your refrigerator should be ready to function.
| Step | Description |
|---|---|
| Electrical Connection | Identify wires, connect, and secure with tape. |
| Gas Connection | Attach hose, check for leaks, and secure connections. |
Following these steps ensures your Dometic RV refrigerator operates safely and efficiently. Properly connecting both power and gas is essential for the appliance’s longevity and your safety.

Credit: www.loveyourrv.com
Testing The New Installation
After installing your new Dometic RV refrigerator, the next step is testing the installation. This ensures that everything is working correctly and safely. Proper testing helps to catch any issues early. This can save you from bigger problems on your trips. Below are the steps to follow when testing your new installation.
Checking For Leaks
Leaks can pose serious hazards. It is important to check for gas and coolant leaks. Use a leak detector solution or a soapy water solution. Apply it to all connections and joints.
- Turn on the gas supply.
- Watch for any bubbles forming.
- If you see bubbles, tighten the connections.
- Repeat the test until no bubbles appear.
Check the coolant lines in a similar way. Ensure they are secure and leak-free.
Ensuring Proper Operation
Once you have checked for leaks, the next step is to ensure the fridge operates properly. Turn on the refrigerator and set it to the desired temperature. Wait for a few hours and then check the internal temperature.
- Place a thermometer inside the refrigerator.
- Wait for at least 4 hours.
- Check the temperature reading.
The ideal temperature for the fridge is between 35°F and 38°F. The freezer should be at 0°F or below. If the temperatures are not within these ranges, adjust the settings and check again.
Listen for any unusual noises. The refrigerator should operate quietly. If you hear strange sounds, consult the user manual or contact a professional for further assistance.
Final Touches
Final touches are crucial in ensuring your Dometic RV refrigerator replacement looks professional. This step includes reinstalling panels and trims and optimizing the refrigerator’s performance. Let’s dive into these details to complete your installation project.
Reinstalling Panels And Trims
Start by placing the panels back around the fridge. Ensure they fit snugly. Use screws to secure them in place. Next, reattach the trims. These pieces cover gaps and give a polished look. Align them carefully for a seamless finish. Double-check for any loose parts. Everything should feel stable and secure.
Tips For Optimal Performance
Keep your refrigerator level. This helps it run efficiently. Check the door seals. They should be tight to prevent cold air from escaping. Set the temperature correctly. The fridge should be at 37-40°F and the freezer at 0°F. Clean the coils regularly. Dust and dirt can hinder performance. Lastly, give your fridge time. It may take a few hours to cool properly after installation.
Maintenance Tips
Maintaining your Dometic RV refrigerator is essential for its longevity and efficiency. Regular maintenance ensures your refrigerator runs smoothly and keeps your food fresh during your travels. Follow these simple tips to keep your refrigerator in top condition.
Regular Cleaning And Inspection
Start by cleaning your refrigerator inside and out. Use mild soap and water. Avoid harsh chemicals. Wipe the interior shelves and compartments. Remove food debris and spills. Inspect the door seals. Ensure they are clean and free from cracks. Damaged seals can cause cooling issues. Check the exterior vents. Clear any dust or debris. This helps with airflow and efficiency.
Troubleshooting Common Issues
If your refrigerator isn’t cooling, check the power supply. Ensure it is plugged in securely. Verify the power source, whether it’s electric or gas. For gas models, check the propane levels. Low propane can affect cooling. Inspect the burner and flue. Clean them if there is soot buildup. This can improve efficiency. If the fridge is noisy, check for loose parts. Tighten any screws or bolts. Listen for unusual sounds. They could indicate a problem with the compressor or fan. If issues persist, consult a professional. Regular maintenance can prevent many common problems.
Frequently Asked Questions
How To Replace A Dometic Rv Refrigerator?
Replacing a Dometic RV refrigerator involves disconnecting the old unit, removing it, and installing the new one. Ensure compatibility.
What Tools Are Needed For Replacement?
You will need a screwdriver, wrench, and possibly a drill. Check the manual for specifics.
Can I Replace The Refrigerator Myself?
Yes, you can replace it yourself if you follow the instructions carefully. It is doable.
How Long Does Replacement Take?
The replacement process usually takes about 2 to 4 hours. Time may vary.
Conclusion
Replacing your Dometic RV refrigerator can seem daunting at first. But, it’s manageable with the right tools and steps. Follow the guide, stay patient, and ensure safety. You’ll soon enjoy a cool, efficient fridge in your RV. Remember, proper maintenance extends its life.
Happy travels with your new refrigerator!