Understanding the wiring of an Onan 4.0 RV Genset can seem daunting. But it doesn’t have to be.
The Onan 4. 0 RV Genset is a popular choice for RV owners. It’s known for its reliability and efficiency. To keep your generator running smoothly, it’s crucial to understand its wiring diagram. This guide will help you navigate the wiring diagram with ease.
We will break down each part of the diagram, making it simple to follow. By the end, you will feel more confident about maintaining and troubleshooting your generator. Whether you’re a seasoned RV owner or a newcomer, this information will be valuable. Let’s dive into the details and ensure your travels are uninterrupted.
Basic Components
Understanding the basic components of an Onan 4.0 RV Genset wiring diagram is crucial. It helps in troubleshooting and maintaining your generator. In this section, we will cover three main components: the generator unit, the control panel, and the battery connections.
Generator Unit
The generator unit is the heart of your Onan 4.0 RV Genset. It converts mechanical energy into electrical energy. This unit includes several parts:
- Stator
- Rotor
- Voltage regulator
The stator and rotor work together to produce electricity. The voltage regulator ensures a steady output. Regular maintenance of the generator unit ensures smooth operation.
Control Panel
The control panel is the brain of your generator. It allows you to start, stop, and monitor the generator. The control panel includes several key components:
| Component | Function |
|---|---|
| Start/Stop Switch | Turns the generator on and off |
| Hour Meter | Tracks running time |
| Indicator Lights | Shows generator status |
Understanding these controls helps you manage your generator effectively.
Battery Connections
The battery connections provide the initial power to start the generator. Proper wiring and maintenance of these connections are essential. Here are the basic steps for connecting the battery:
- Connect the positive terminal of the battery to the positive terminal of the starter.
- Connect the negative terminal of the battery to the chassis ground.
- Ensure all connections are tight and secure.
Proper battery connections ensure reliable generator startup.
Credit: www.gmcmotorhome.org
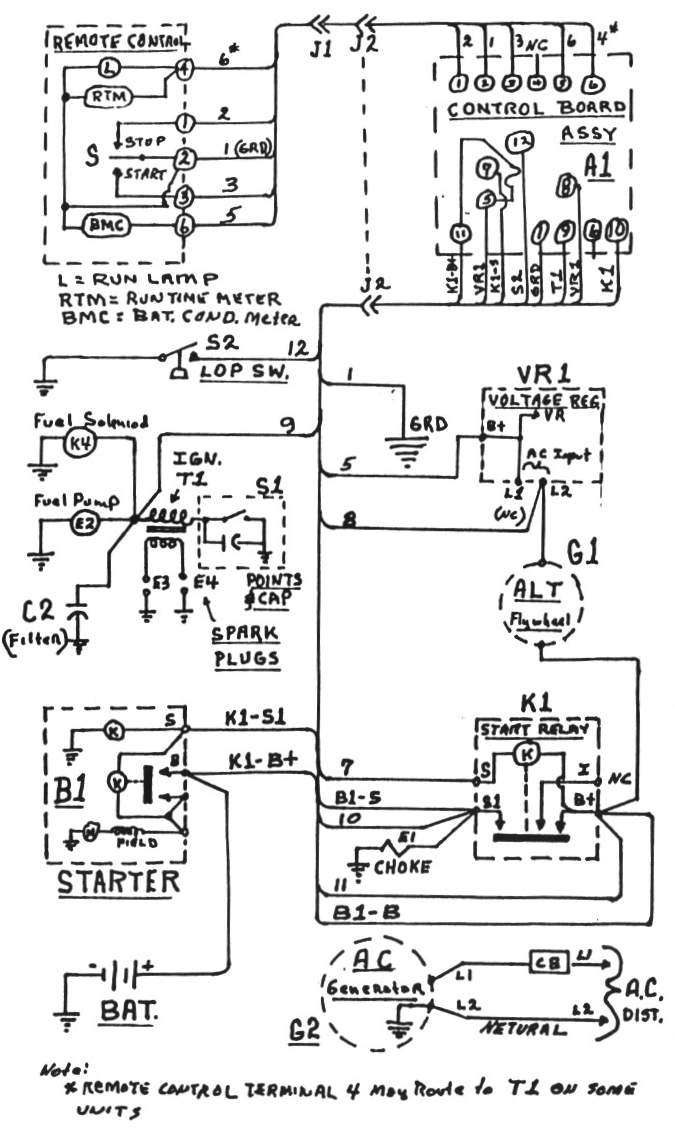
Wiring Diagram Breakdown
Understanding the Onan 4.0 RV Genset Wiring Diagram can seem complex. Breaking it down into parts helps. We will focus on color codes, symbol meanings, and wire types. This breakdown will simplify the wiring process for you.
Color Codes
Color codes in the wiring diagram identify different wires. Each color represents a specific function. Here are some common color codes:
| Color | Function |
|---|---|
| Red | Positive Power Supply |
| Black | Ground or Negative Power Supply |
| Green | Chassis Ground |
| Blue | Control Circuits |
| Yellow | Sensor Signals |
Symbol Meanings
Symbols in the wiring diagram show the components and connections. Here are some common symbols:
- Battery: Represented by a rectangle with a plus and minus sign.
- Ground: Shown as a line with three descending lines.
- Switch: Depicted as a break in a line with a pivot.
- Resistor: A zigzag line shows resistance.
- Fuse: Symbolized by a rectangle with a line through it.
Wire Types
Different wire types serve specific purposes. Here are some common wire types in the Onan 4.0 RV Genset Wiring Diagram:
- Solid Wire: Best for fixed positions. It offers less flexibility.
- Stranded Wire: Made of many small wires. It is flexible and ideal for movable connections.
- Shielded Wire: Comes with a cover to prevent interference. Used for signal cables.
- Twisted Pair: Two wires twisted together. Reduces electromagnetic interference.
Understanding these elements makes it easier to read the wiring diagram. This knowledge ensures proper installation and maintenance. Your RV genset will operate smoothly and safely.
Step-by-step Wiring Process
Wiring your Onan 4.0 RV Genset can seem overwhelming. By breaking it down into simple steps, you’ll find the process much easier. This guide will walk you through each part of the wiring process.
Safety Precautions
Before you start, make sure to follow essential safety precautions. Safety should always come first.
- Turn off the RV’s main power supply.
- Wear protective gloves and goggles.
- Ensure the generator is in a ventilated area.
- Keep a fire extinguisher nearby.
Initial Setup
Begin with the initial setup to prepare for wiring.
- Read the Onan 4.0 RV Genset manual.
- Gather all required tools and materials.
- Locate the wiring diagram in the manual.
- Identify all the components and wires.
Connecting The Generator
Now, let’s move on to connecting the generator. Follow these steps:
- Connect the battery cables to the generator terminals.
- Attach the ground wire to the chassis.
- Link the AC output wires to the RV’s electrical system.
- Secure all connections with cable ties.
Ensure all wires are tight and secure. Double-check each connection to prevent any issues.
| Component | Description | Connection Point |
|---|---|---|
| Battery Cables | Supplies power to the generator | Generator Terminals |
| Ground Wire | Prevents electrical faults | Chassis |
| AC Output Wires | Connects generator to RV | RV Electrical System |
Following these steps will help you wire your Onan 4.0 RV Genset correctly. Take your time and ensure each step is completed accurately.
Common Issues
Understanding the Onan 4. 0 RV Genset wiring diagram can be challenging. Common issues include misconnected wires and faulty connections.
Owning an Onan 4.0 RV genset can make your travel more comfortable. Yet, understanding its wiring diagram can be challenging. Wiring issues are common and can cause frustration. Knowing these issues can save you time and headaches.Troubleshooting Tips
First, check for loose connections. Loose wires can disrupt the power flow. Tighten any loose connections you find. Second, inspect the wires for any damage. Look for cuts, burns, or frayed wires. Replace damaged wires immediately. Third, verify the voltage levels. Use a multimeter to check the voltage. Make sure the voltage matches the generator’s specifications.Frequent Wiring Mistakes
Incorrectly connected wires are a common mistake. Ensure each wire is correctly connected. Follow the wiring diagram closely. Overloading the circuit can also cause problems. Do not connect too many devices to the generator. This can cause the wires to overheat. Lastly, using the wrong gauge of wire is a frequent mistake. Use the recommended wire gauge. Thinner wires can overheat and cause failures. “`Maintenance Tips
Keeping your Onan 4.0 RV Genset in top shape is vital. Regular maintenance ensures long life and smooth operation. Follow these tips to keep your generator running well.
Regular Inspection
Check your genset often. Look for loose connections and worn wires. Inspect the battery and ensure it is charged. Examine the fuel lines for cracks or leaks. Regular inspections help spot problems early. This can prevent costly repairs.
Cleaning And Upkeep
Keep your generator clean. Dust and dirt can clog the system. Wipe the exterior with a damp cloth. Clean the air filter regularly. Replace it if it is too dirty. Check the oil level and change it as needed. Clean oil keeps the engine running smoothly.
Credit: www.gmcws.org
Advanced Wiring Tips
Mastering the wiring of your Onan 4.0 RV Genset can be a rewarding task. It can enhance the performance and reliability of your generator. These advanced wiring tips will help you make the most out of your genset. Whether you’re upgrading components or enhancing performance, these tips will guide you through the process.
Upgrading Components
Upgrading components in your Onan 4.0 RV Genset can lead to better efficiency and longevity. Here are some key areas to consider:
- Wiring Harness: Replace old and worn-out wiring harnesses. Newer models are more efficient and safer.
- Fuses and Relays: Ensure you use the correct fuse ratings. Upgrading to modern relays can prevent overheating and short circuits.
- Connectors: Use high-quality connectors. They provide better conductivity and reduce the risk of loose connections.
Enhancing Performance
Enhancing the performance of your Onan 4.0 RV Genset involves optimizing the wiring layout and maintaining the system. Follow these tips for improved performance:
- Wire Gauge: Use the correct wire gauge for the power load. It reduces resistance and prevents overheating.
- Grounding: Ensure proper grounding. It prevents electrical noise and stabilizes the system.
- Regular Inspections: Inspect the wiring regularly. Look for signs of wear, corrosion, or damage.
By following these advanced wiring tips, you can ensure your Onan 4.0 RV Genset performs at its best. Upgrade key components and enhance performance through proper wiring techniques. Your generator will be more reliable and efficient.

Credit: www.smokstak.com
Frequently Asked Questions
What Is An Onan 4.0 Rv Genset?
The Onan 4. 0 RV genset is a generator used in RVs. It provides reliable power for appliances and electronics.
How Do I Find A Wiring Diagram For Onan 4.0 Rv Genset?
You can find the wiring diagram in the user manual. It’s also available on the manufacturer’s website.
Why Is Wiring Diagram Important For Genset?
A wiring diagram helps in proper installation and troubleshooting. It ensures safe and efficient operation of your genset.
Can I Install The Onan 4.0 Rv Genset Myself?
Yes, but it’s recommended to have a professional install it. Proper installation ensures safety and optimal performance.
Conclusion
Understanding the Onan 4. 0 RV Genset wiring diagram is crucial for RV owners. It helps ensure safe and efficient power management. Clear diagrams make troubleshooting easier. Regular maintenance prolongs the generator’s life. Always refer to the manual for accurate information.
Investing time in learning the wiring diagram pays off. It saves money and prevents issues. Stay informed and keep your RV running smoothly. A well-maintained genset guarantees a hassle-free journey.