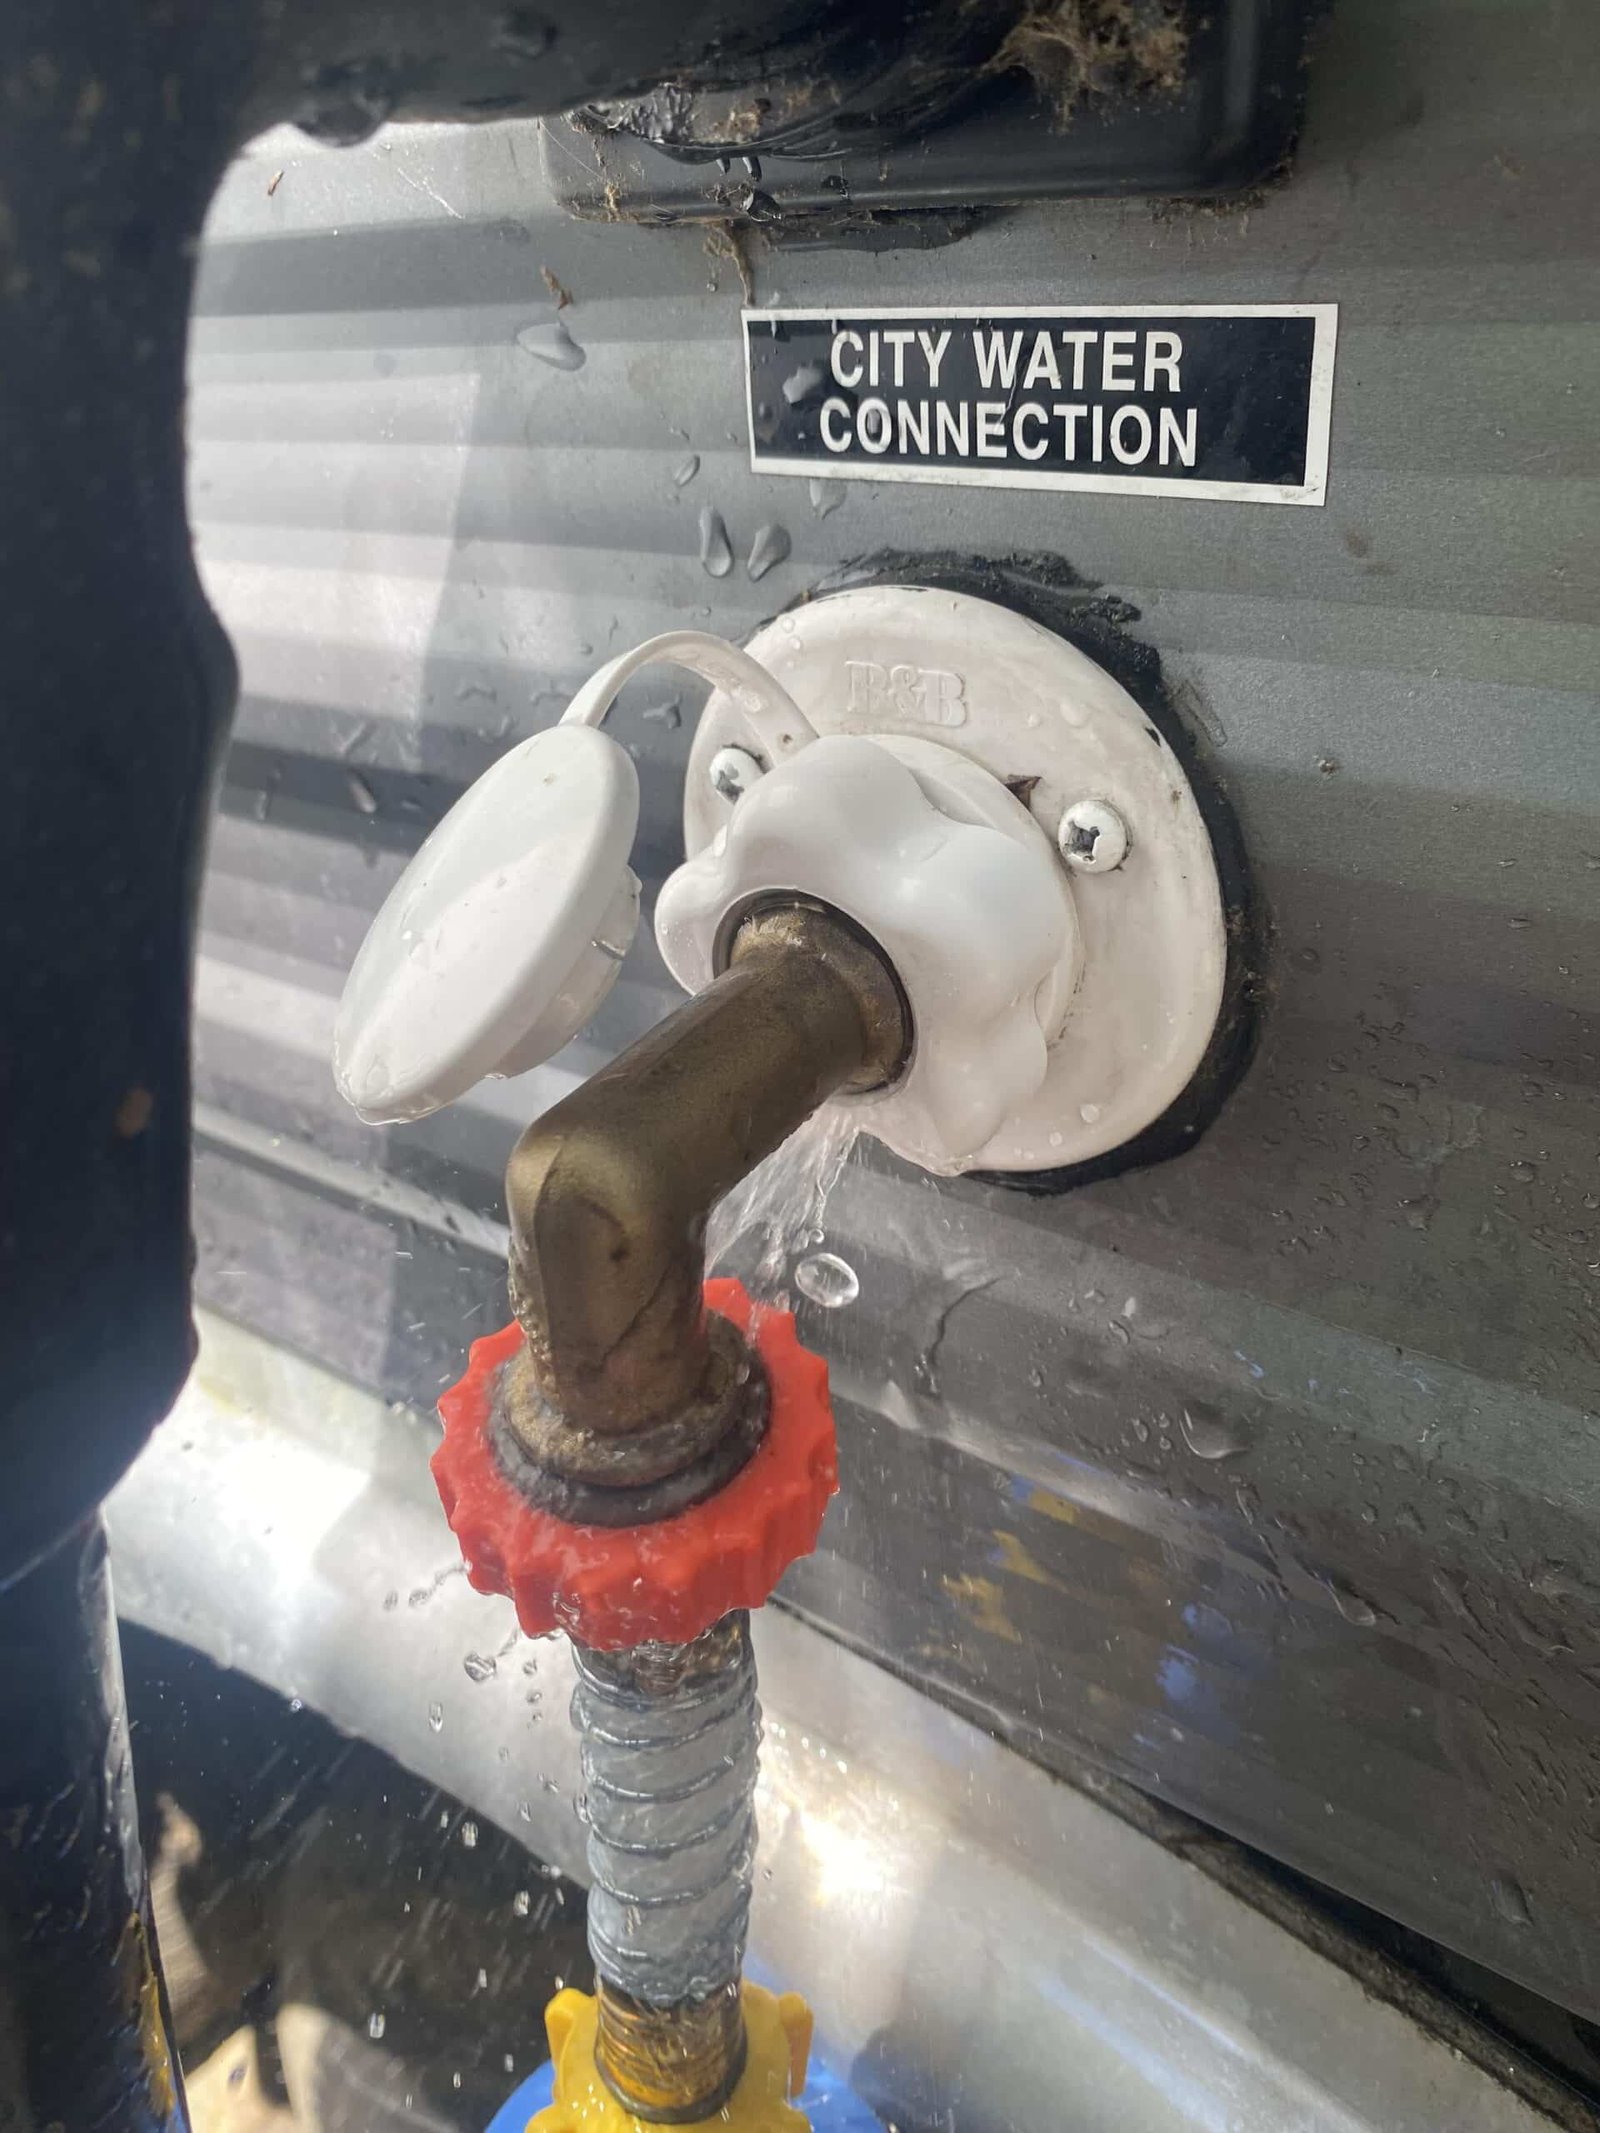
Is your RV city water connection leaking? This common issue can cause stress and mess.
A leaking RV water connection can disrupt your travel plans. It can lead to water damage and costly repairs. Understanding the reasons behind the leak is crucial. Fixing the issue promptly is essential to avoid further problems. You might notice a small drip or a larger water flow.
Either way, addressing it quickly saves time and money. This blog will guide you on identifying the leak’s cause. It will also offer simple solutions to fix it. Whether you’re a seasoned RV traveler or new to the lifestyle, these tips will help. Let’s dive in and keep your RV dry and functioning well.
Common Causes Of Leaks
Leaks in your RV city water connection can be a real headache. Understanding the common causes can help you fix the problem quickly. Let’s explore the most frequent reasons behind these leaks.
Loose Connections
Loose connections are a common culprit for water leaks. If the hoses or fittings are not tight, water can seep out. Over time, the vibrations from driving can loosen these connections. To fix this, check all connections regularly. Use a wrench to ensure they are snug but not overly tight.
Damaged Seals
Damaged seals can also cause leaks. Seals around fittings and connections can wear out. This happens due to age or constant use. Inspect these seals for cracks or wear and tear. If you find any damage, replace the seals immediately.
Faulty Hoses
Faulty hoses are another common issue. Hoses can develop cracks, holes, or weak spots. This is especially true for older hoses. Regularly inspect your hoses for any signs of damage. If you spot any issues, replace the hoses to prevent leaks.
Identifying The Leak Source
Identifying the source of a leak in your RV city water connection is crucial. A leak can cause damage and wastewater. There are several methods to pinpoint the exact location of the leak.
Visual Inspection
Start with a visual inspection. Look for wet spots or water stains around the connection. Check the hose for any visible cracks or holes. Examine the connection point for any signs of wear or damage.
Pressure Testing
Next, perform a pressure test. Turn off the water supply and attach a pressure gauge to the system. Slowly turn the water back on and monitor the gauge. A drop in pressure can indicate a leak in the system.
Listening For Drips
Listen for drips. Sometimes, you can hear the leak before you see it. Pay attention to any unusual sounds around the connection. A dripping sound can guide you to the exact spot of the leak.
Essential Tools And Supplies
When dealing with a leaking RV city water connection, having the right tools and supplies is essential. This ensures you can address the issue quickly and effectively. Let’s take a look at the basic tools and supplies you’ll need.
Wrenches And Pliers
Wrenches and pliers are must-have tools for any RV owner. They help tighten or loosen connections. An adjustable wrench is versatile and fits various sizes of nuts and bolts. Pliers, on the other hand, offer a good grip. Both tools are crucial for handling fittings and hoses securely.
Sealant Tape
Sealant tape, often known as plumber’s tape, is another essential supply. It helps create a watertight seal around threaded connection. Wrap the tape around the threads before connecting parts. This prevents leaks and ensures a tight fit.
Replacement Parts
Sometimes, the best solution for a leak is to replace worn-out parts. Keep spare parts on hand, such as washers and O-rings. These small parts wear out over time, causing leaks. Having replacements ready can save you a lot of trouble.

Credit: www.youtube.com
Step-by-step Quick Fixes
Dealing with a leaking RV city water connection can be frustrating. But don’t worry, you can fix it yourself with a few simple steps. Below are some quick fixes to get your RV back in shape.
Tightening Connections
First, check all the connections. Loose connections are a common cause of leaks. Use a wrench or pliers to tighten the connections.
- Turn off the water supply.
- Inspect each connection point.
- Use a wrench to tighten any loose fittings.
Be careful not to over-tighten. Over-tightening can damage the fittings.
Replacing Seals
Sometimes the seals or gaskets wear out and cause leaks. Replacing them is straightforward.
- Turn off the water supply.
- Disconnect the hose from the water inlet.
- Remove the old seal or gasket.
- Install a new seal or gasket.
- Reconnect the hose.
Ensure the new seal fits snugly. This will prevent future leaks.
Fixing Hoses
Hoses can also be a source of leaks. Inspect them for any cracks or damage.
| Step | Description |
|---|---|
| 1 | Turn off the water supply. |
| 2 | Inspect the hose for cracks or leaks. |
| 3 | If damaged, replace the hose. |
| 4 | Reconnect the new hose securely. |
Check the hose connection points. Ensure they are secure and not leaking.
Preventing Future Leaks
Experiencing a leak in your RV city water connection can be frustrating. But, you can prevent this issue with a few simple steps. Follow the tips below to ensure your water connection stays leak-free.
Regular Maintenance
Regular maintenance is key to preventing leaks. Check the hoses and connections often. Look for any signs of wear or damage. Replace any worn parts immediately. This simple step can save you from bigger problems later.
Proper Storage
Store your RV properly when not in use. Make sure hoses are drained and stored in a cool, dry place. Avoid leaving hoses exposed to extreme temperatures. Proper storage can prolong the life of your water connections.
Using Quality Parts
Always use quality parts for your RV water system. Cheap parts may save money now but can cause leaks later. Invest in durable, high-quality hoses and connectors. Quality parts ensure a reliable water connection for your RV.

Credit: www.loveyourrv.com
When To Call A Professional
Dealing with a leaking RV city water connection can be frustrating. Sometimes, the problem goes beyond a quick fix. Knowing when to call a professional is crucial. It can save you time and prevent further damage. Here are key situations that require expert help.
Persistent Leaks
If the leak continues after basic troubleshooting, it’s time to call an expert. Persistent leaks can indicate a deeper problem. Professionals have the tools and knowledge to find and fix the issue. Ignoring it can lead to bigger problems down the road.
Complex Repairs
Some repairs are too complex for a DIY approach. If the issue involves multiple components, seek professional help. Experts can handle complicated repairs with precision. They ensure everything works properly, keeping your RV safe and functional.
Water Damage Concerns
Water damage can be a serious problem in RVs. If you notice signs of water damage, contact a professional immediately. They can assess the situation and provide the best solution. Early intervention can prevent costly repairs and maintain the integrity of your RV.
Diy Vs Professional Repairs
Dealing with an RV city water connection leaking can be frustrating. You might wonder whether to tackle it yourself or hire a professional. Each option has its own benefits and drawbacks. Let’s dive into the specifics of DIY vs Professional Repairs for your RV’s water connection.
Cost Considerations
Cost is a key factor. DIY repairs usually cost less upfront. You may only need to buy a few tools or parts. Professional repairs can be more expensive. The labor costs add up quickly.
| Repair Type | Average Cost |
|---|---|
| DIY | $20 – $100 |
| Professional | $100 – $300 |
Skill Requirements
DIY repairs need some basic skills. You should be comfortable using tools. Reading a repair manual helps too. Professionals have specialized training. They know how to handle complex issues.
If you lack experience, DIY can be risky. You might worsen the problem. On the other hand, professionals guarantee their work. They often provide warranties for repairs.
Pros And Cons
Both DIY and professional repairs have their advantages and disadvantages.
- DIY Repairs
- Pros: Cheaper, sense of accomplishment, immediate fix.
- Cons: Risk of errors, time-consuming, may need special tools.
- Professional Repairs
- Pros: Expertise, warranty, less stress.
- Cons: Higher cost, scheduling needed, may take longer.
Choosing between DIY and professional repairs depends on your budget, skills, and time. Consider all factors before making a decision.
Maintaining Rv Water Systems
Proper maintenance of your RV water system prevents leaks and ensures a smooth journey. Regular checks and cleaning can save you from unexpected issues. Let’s explore how to keep your RV water system in top shape.
Seasonal Checks
Seasonal checks are crucial. They help you spot potential problems before they worsen. Here are some tasks to include in your checklist:
- Inspect hoses and connections for wear and tear.
- Check for any signs of water leaks around the fittings.
- Ensure the water heater is functioning correctly.
- Test the water pump for consistent pressure.
Cleaning Protocols
Keeping your RV water system clean extends its lifespan. Follow these steps for effective cleaning:
- Drain the water tank and lines completely.
- Mix a cleaning solution of water and white vinegar.
- Fill the tank with the solution and let it sit for a few hours.
- Flush the system with fresh water until all traces of vinegar are gone.
Long-term Care Tips
For long-term care, follow these tips to maintain your RV water system:
| Task | Frequency |
|---|---|
| Check for leaks | Every trip |
| Clean the water tank | Every 3 months |
| Inspect the water pump | Twice a year |
Following these simple steps can prevent RV city water connection leaking issues. Keep your water system in good condition and enjoy a hassle-free RV experience.

Credit: www.reddit.com
Frequently Asked Questions
Why Is My Rv City Water Connection Leaking?
Your RV city water connection might be leaking due to loose fittings, damaged hoses, or worn-out seals. Inspect all connections, hoses, and seals for damage.
How Do I Fix A Leaking Rv Water Connection?
To fix a leaking RV water connection, tighten all connections, replace damaged hoses, and check seals. Ensure everything is secure.
Can I Use Tape For Rv Water Leaks?
Yes, you can use plumber’s tape for temporary fixes on threaded connections. It’s a quick and easy solution.
What Tools Do I Need To Fix Rv Water Leaks?
You may need a wrench, plumber’s tape, replacement hoses, and seals. These tools can help you fix most leaks.
Conclusion
Fixing a leaking RV city water connection isn’t difficult. Just requires a few tools. Regular checks help prevent future leaks. Always tighten connections properly. Replace worn-out parts promptly. Seek professional help if unsure. Avoiding leaks saves water and money. Your RV trips stay stress-free.
Keep your RV in great shape. Enjoy your adventures!